Instructions for building artificial
nests
and about how to get hold of an ant
colony.
Nest for Leafcutter Ants (Fungus-growing Ants)
Expendable formicary out of test-tubes
How to get
hold of an ant colony
Necessary material:
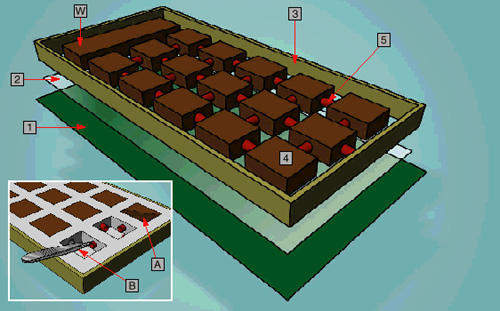
The rubber mat (1) is placed on an even surface with the sheet of pane (2) right in the middle. Then the wooden frame (3) needs to be put around the sheet of pane. Out of the modelling clay (4) you need to form small square blocks that have to be arranged on the pane according to the drawing. The individual blocks are connected to those adjoining through the plastic tubes (5) that are pressed into the individual blocks. A wider block (marked (W) in the drawing) is not linked to the adjacent ones and serves as water collecting tank. The plaster is mixed according to the directions and poured into the mould. When the plaster has become solid, the complete construction needs to be turned and the rubber mat removed. Plaster mixture between the rubber mat and the pane should be removed carefully with a knife. After removal of the sheet of pane, the modelling clay - still soft - is scraped out (A) with a spoon. The rubber tubes are taken out with a small pair of pliers or tweezers (B).
Then the finished formicary is freed of the remaining modelling clay with cold water. For those ant species that are able to bite through the plaster the nest should be painted with marbled lacquer. The pane is cleaned and placed into the depression formed through the cast. Into the side of the formicary a hole of the diameter of a plastic tube needs to be drilled. Then a rubber tube is inserted and connected to a plastic terrarium serving as food reservoir. In order to keep the plaster humid, you may pour water into the big chamber. Thus those chambers close to the water chamber contain more humidity than those that are further away.
Necessary material:
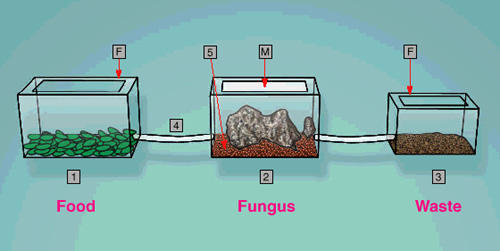
For Leafcutter Ants like Atta and Acromyrmex long surfaces (more than 2.5 m) are needed. The basins are to be arranged in a row. The waste chamber should be placed slightly lower so that the created gases that are detrimental to the fungus may not get into the fungus basin. In order to insert the tubes through which the ants can reach the individual basins, holes need to be drilled into the terrariums. The big basins serve as food and nest chamber. The fungus basin should be placed in the middle. The small basin is kept dry and served as waste chamber. The ants can be trained to use the basin accordingly by putting some of their waste into the tube. The ground of the fungus basin is covered with clay balls (3 cm). As a result of this small puddles do not form on the bottom. By using heating mats the temperature in the nest basins is maintained between 22 to 25° C. The food and waste basin are covered with a 7 cm-wide frame (F) respectively the undersides of which should be greased with paraffin oil to prevent the ants from leaving the basins. The fungus basin needs to be kept closed, dark and damp by spraying the side walls (80 % humidity and more). An opening of 10 x 10 cm in the cover (closed with wire mesh (M)) will ensure air circulation. In case of a bigger colony it is recommended to use a clay or wooden cover since otherwise the fungus can be damaged through excessive condensation. At the level of the clay balls a hole should be drilled and connected to a tube to let out surplus water. Since Atta and Acromyrmex colonies may reach enormous sizes, it is appropriate to provide the fungus basins with additional tube openings right at the beginning so that further basins may be added. Until then these openings should be kept closed.
Necessary material:
For this expendable formicary test-tubes as well as long glass tubes with connected glass tubes (S) at their sides are needed. These may possibly be obtained from suppliers of pharmaceutical institutes and chemical laboratories as well as glassblowers. The plastic test-tubes (without side tubes) are used as chambers, those with as corridors of the ant nest. The test-tubes out of plastic are filled up to a quarter with plaster. At the level of the plaster a small hole needs to be drilled (8) to insert water with a syringe or hypodermic. Then the test-tubes have to be closed with the rubber stoppers (with hole). Into the stopper a short glass tube is inserted over which a piece of rubber tube linked to the glass test-tubes with side tubes is pulled.
According to their design up to eight chambers can be linked to these test-tubes. The food reservoir is linked to one side tube. Such a formicary may be expensive, however, ideal since its size can be adjusted to the size of a colony.

| Mini-Colonies
Necessary material:
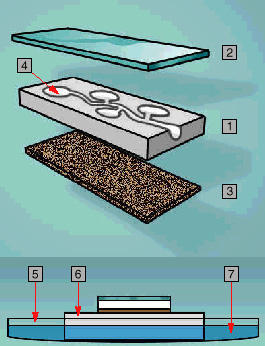
For small ant colonies with little ants plaster boards may be cast into which chambers and corridors are carved (4). Those boards are then covered by the panes (e. g. micro slides). Then the nest is placed on a pedestal (6) - with the sponge in between -standing in a container (5) filled with water (7). Feeding takes place on the pedestal. The sponge must be kept wet. |
 |
Necessary material:
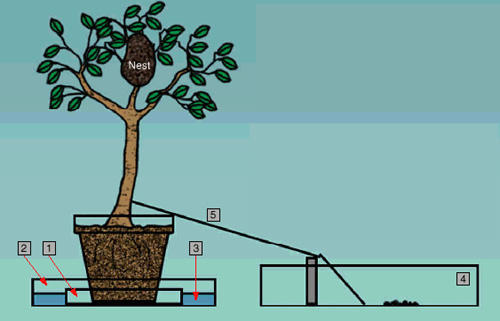
For ants living on trees a small lemon tree may be used. The smaller saucer (1) is placed into the bigger one (2) and the gap filled with water (3). The tree is then put onto the small saucer and the ants may reach their food basin (4) over the willow rod (5) connected to the flowerpot.
When the nuptial flight of an ant species starts, you should collect several queens and put each of them into a test-tube out of plastic or Petri dishes the bottoms of which are covered with moist plaster. You can recognize fertilized queens by their broken wings. The test-tubes should be wrapped with aluminum foil and kept warm. Please control the test-tubes regularly and increase the humidity level if necessary. For this purpose plastic test-tubes need to have a hole at the level of the plaster filling (see expendable formicary).
After some time you will discover the first eggs. Just observe their developing until the first workers show. Then connect another test-tube to offer food. Choose the most successful colony out of those with more than 100 workers to settle it in the formicary. Feed according to the species.
Feeding: A varied diet is very important for the ants. A monotonous diet will result in failure. It is also necessary to feed the ants with very fresh food (every day). For hunting ant species mealworms, flies, larvae and pupae of other ant species and even raw meat may be used as food.
It is recommended to keep one’s own insect breedings to feed the ants. You could, for example, put a piece of cheese rind into a container filled with coffee grounds to lure flies. Once they have laid their eggs on the rind, you can put it into a closed insect box out of which flies and larvae for feeding can be taken continuously. Mealworms (Tenebrio) are bred by putting mealworms bought in a pet shop onto a mixture of bran and flour. On top of it you should put a piece of dry bread. The larvae gather in the moist and crumpled cloth everything is covered with. Pupae should be put into a separate breeding container (lest they are eaten by the larvae) as well as the hatched beetles.
A nourishing diet can be mixed out of egg yolk, yeast, trypsin, pepton, ovomaltine and pollen.
Diet mixture for ants:
Everything has to mixed, filled in Petri dishes and stored in the refrigerator.
Click here for a printable version of this page.